
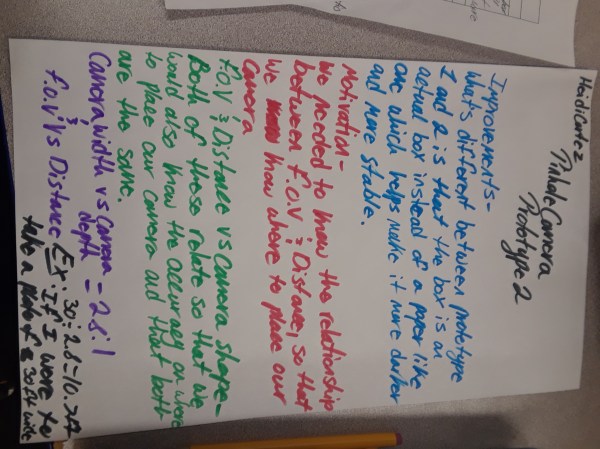
Pinhole Camera Prototype 2
Banner Project
Reflection-
Once we finished this banner, we felt so accomplished. After a week worth of work, we came up with the final product thats is up above. For this project we had to select one of our core value’s and we chose Resilience. We believed that Resilience is what strongly represents us as a class. The way that Resilience was actually shown in this poster was the fact that, we worked together in this. We made sure that we used the ideas of each other so that we incorporated something of our own in this poster. We made draft which is how we got our ideas from each other. The steps that we did to do the banner was very challenging but we were able to overcome them. We first we discovered that we even had to do this and this is when the questions rolled in. After asking and answering all of these questions, we moved onto finding the materials for the banner on a website and we even listed them out. Fortunately, we were able to acquire most of the materials. We then moved onto making our first draft and from this, we gave compliments on each others to see what elements from our drafts were really good to use in our final poster. We took many useful ideas and even added some more. We then moved onto the final poster and we started to work on it and may I say, I believe that it was a success. Even I was able to incorporate things in this poster. I added a beanie since its something that I wear often and when people see me its something that they will know its me. I also added the “discover” onto this poster at the very top. Since the 5 D’s is something that is very important in this school and we use it on the daily, During this project, I was able to use discover, define, design, develop, and deliver to help me create this banner. So, allow me to explain how I used these in my project. The way that I used discover is by asking questioning about our banner such as, what materials can we use?, When is this project due?, ECT. We discovered that we had to create a banner and we were able to find out when it was due and it was due on, January 15th. We used “define” by making our first drafts and our group drafts. We used “develop” by using the ideas of each other own drafts and our groups ideas and we took them and we moved onto “design”. In this stage, this is when we just started to create our poster and worked as a team to get it done. This is when we moved onto “deliver” and we finished the poster.
5.8: Poster
Camera 5.3: Basic Of Light
The Setup
The reason being that the room had to be so dark, was to be able to see any other light such as a light bulb, be more visible.
What was done to make sure that the room was completely dark was, the windows at the front of the room was covered up because on the other side of that window, there was light showing. Once that was done, we then proceeded to turn off the light.
Just A Red Light Bulb
When the red light bulb was turned on in the dark room, the nearby objects was also turning red because the light was reflecting upon it.
So because the nearby objects turned red because the red light was hitting it, what this is proving is that the light travels in any direction from a light source. (Except down because in a light bulb, something is blocking it and preventing the light to go down.)
Single Red Light, Hole, And Screen Experiment
In this experiment, the 3 essential components were the smart board (screen), 1 hole, and light.
The thing that was capable of going through the hole was, light.
When the light was held on the top-left corner, the spot that light would appear on the screen was on the bottom right corner.
What this experiment proved about how light traveled was that, you are capable of controlling on where the light goes. I say this because, if you were to isolate the light but have only 3 holes, then that will allow the light travel through those holes only.
Picture, Hole, And The Screen Experiment
In this experiment, the 3 essential components were the smart board (screen), 1 hole, and the picture that would show a letter.
The picture was of a letter F and since that was used, what I saw on screen behind the hole was light.
The picture was mirrored and that’s because, when the image would appear on the screen it would show the letter but upside down.
Size Of The Hole Experiment
Now we take it a bit step further and we increased the size of the hole and when doing so, the image got more blurry.
The image also got more brighter when the hole increased.
Distance Between The Hole And The Screen Experiment
Instead of doing an image, we did ars instead. When the screen was closest to the the hole, the amount of bars that I was able to see were about 3.
When the screen was farthest from the hole, I was able to see almost all of the bars.
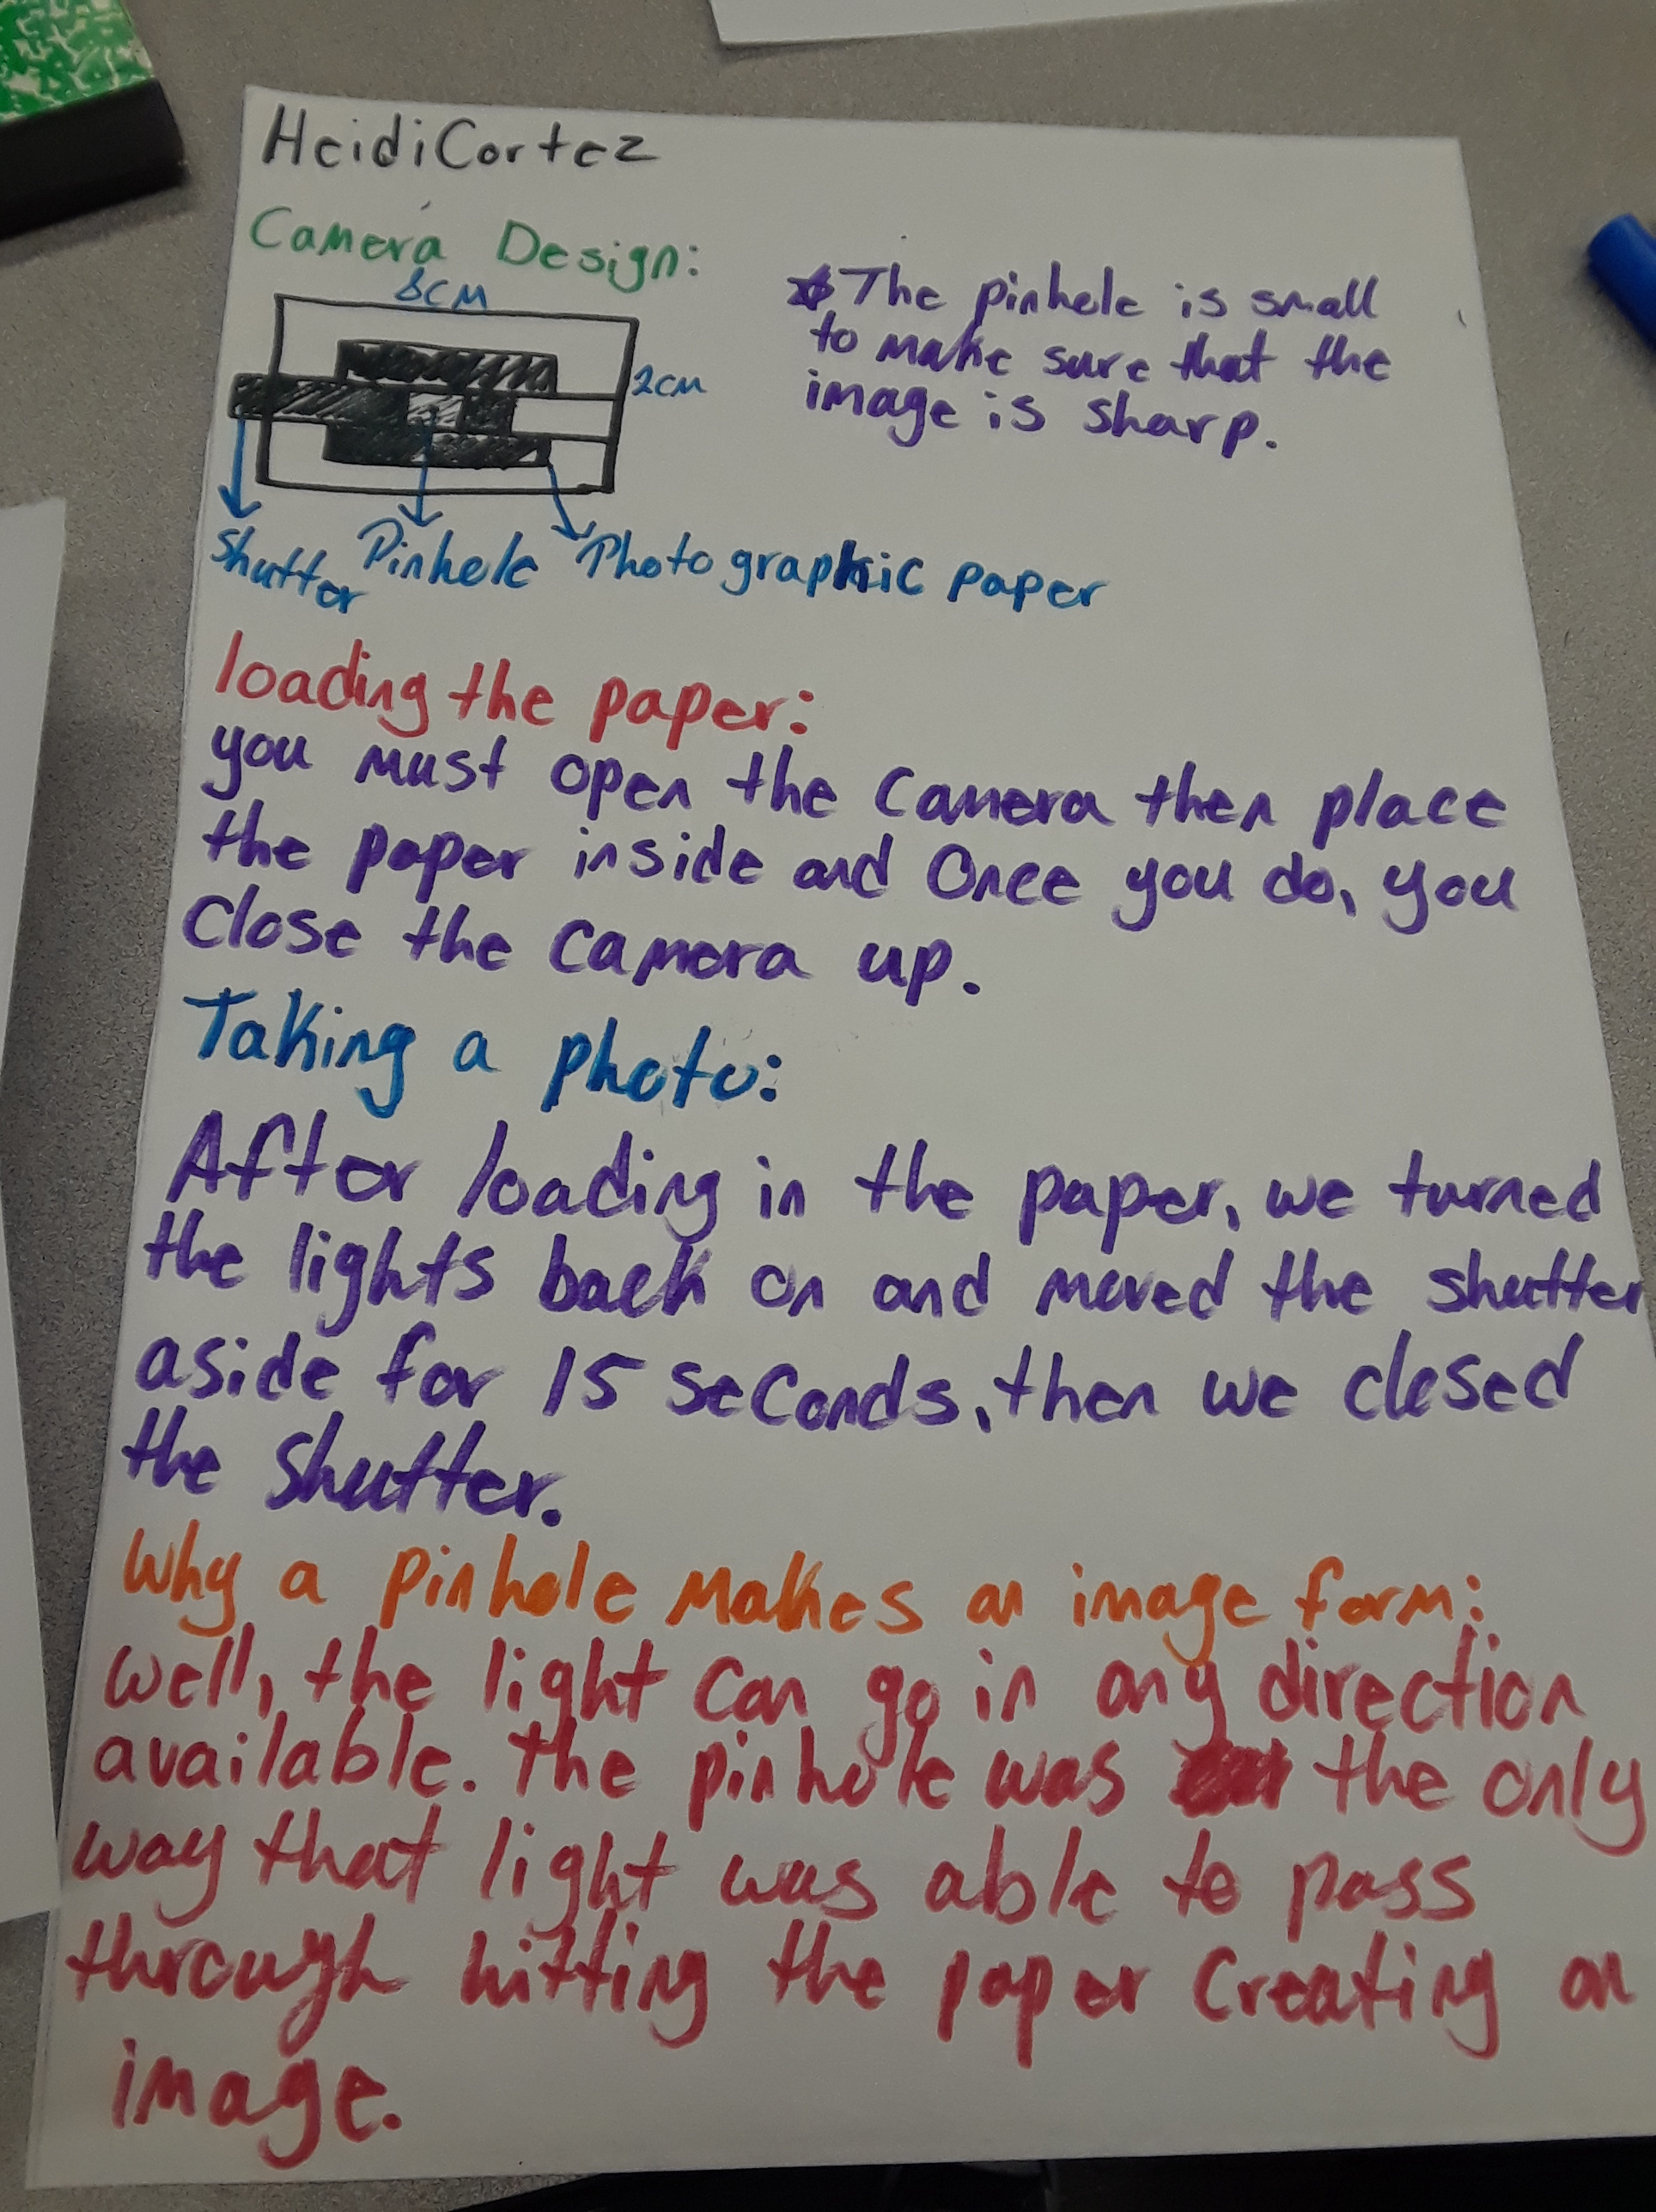
Designing A Camera
Since we did these experiments, we will now be making a pinhole camera. Based on the experiments, I should be using a small hole in order to achieve the sharpest image.
Also, my camera should be able to capture everything that I want it to capture so, in order for this to happen I must put the film far back in order to have that wide-angle.
Reflection On Feedback
In our foundation design class, we did a small lesson where we did the gallery walk. The way that the gallery walk work was that, we were in a small group of 3 or 4 and we would go to our own design work and critique it. We were given a paper that had these four categories- Description, Analysis, Interpretation, and Judgement. Today, I will be looking at one of my classmates typeface design but as well as talking about my own feedback and how this will better help me in the future and help improve for MP3.
When critiquing my classmates work, I used this worksheet with four categories on it which are- Description, Analysis, Interpretation, and Judgement. For description, In my classmates work, the way that he did his design had many sharp edges and as well as, had gaps for every letter. For analysis, His design did follow up every letter with the gaps and sharp edges as well as all the letters are fully completed. For Interpretation, The letters may have seem to be futuristic in a way because of the gaps. Finally for judgement, The letters in all were very good in my eyes and he really did a wonderful job in making sure to follow the design in each letter.
For my feedback, The way it went was that my teammates just ask me a bunch of questions such as, How did you come up with your design? Is this how you wanted it to look? Are you completed? And many more great questions. Also just me explaining my design. My design was more based off a gothic theme and I tried my best to stick with it and there was a certain design that I made sure to follow up in every letter.
The gallery walk lesson and just the feedback could help me improve in MP3 because the feedback that was said could be in MP3 and at least now I know how I could do it and use that feedback to help me in whatever case I’ll be working on in MP3.
Typography
Today, we will be covering the topic of “Typography” and answering the following questions which are, What is typography? How can typography become art?
What words inspire you? What do you think are the advantages of learning about the world of typography?

What Is Typography?
Typography refers to the mean by which typefaces are displayed or presented by text/words. Typography has such a huge background story to it from where it first started and where its at currently. By just looking at that, you can actually see the evolution of typography and how far it has come. Which was all by a creative mind.
How Can Typography become art?
Typography can become art by the way someone can design their own and make it into a written language that can be read once its displayed. Typography can actually become a beautiful thing once you notice at the curves or the many shapes and many other things it has, and you can use those to create art and make typography into art.
What words inspire you?
A few words that inspire me and give me a positive view on things is the word hope. This word helps me in most situations and I even state this word quit often in any situation. Another word that inspires me is, different is beautiful. Though this isn’t just one single word, I still wanted to add this in because this inspires me. This inspires me because, I helps me and represents who I am and as well as who anyone else is because some people are scared that because they are different that its bad or something when it truly isn’t.
What do you think are the advantages of learning about the world of typography?
Some advantages about learning the world of typography is by learning a new way of a writing a written language. Also, by learning how it was created and where it was originally from. Not only that but to understand the importance of typography and why this world needs it so much and to understand its usefulness. But to also understand how the evolution happen and where the evolution came from and the ideas behind it. Trust me, learning about typography can be very interesting and also understanding the story behind it all.
Headphones 1.18: Prototype #2

The Project–
My headphones prototype #1 worked but wasn’t loud enough. The goal of prototype #2 was to find out if we can change one variable in the experiment in order to find a way to make the headphones more louder and clearer.
I changed one design variable to see how it affected sound volume. The design variable that I change was to wind the wire 50 times instead of 100 times.
I kept all the other variables the same to be able to check if it was only one thing affecting the fact that the headphones weren’t as loud and if it wasn’t then maybe in the future I’ll change another variable to test it out.
Data–
The value of the number of times I winded the wire for my prototype #1 was 100 times.
The value of the number of times I winded the wire for my prototype #2 was 50 times.
My prototype #2 sounded more louder and clearer than prototype #1.
Claim–
My prototype #2 produces louder sound
Reasoning–
My data suggests that this is true because prototype #2 had a clearer and sounded more louder then my prototype #1 which was less louder and didn’t sound as clear but what I was able to feel vibration.
Significance–
If I were to make a prototype #3, I would increase the number of magnets in order to get the loudest sound.
Map Of Maker Performance Task


During this unit we were working our way up to the final performance task. In order to complete this performance task we used the 5 D’s, our core values and even how our collaboration in this project helped us finish it.
How Did Our 5 D’s Help Us In Our Performance task?
While working to make our way into the performance task, we used the 5 D’s to help us in order to complete this performance. How did it help us? You may ask. Well allow me to explain to you why and how it helped us complete this performance task.
Design Thinking Reflection–
Discover–
• The way that “Discover” was used during this process was by the fact that we noticed that many students don’t exactly know where the main office is or where Ashley is. So, we discovered that we must make a map of maker to help students find their way through the maker academy.
Define–
• During this process we were able to use “Define” to help us as well. The way it helped us was by identifying the criteria we need and describing them for some good map needs.
Design–
• How did we proceed to make a maker map for anyone needs? Well, some of the things that we did to help us was identifying the knows and needs to know about the map. Then, we were able to explore the school and ask many questions to staff members to get any information we needed to be able to continue with the map. Next, we made a prototype that’ll help us in the future with making our final map. Lastly, we made a final project that we made of maker.
Develop–
• During this step of the design thinking process, from the first prototype, us as a group were able to discover any flaws or highlight to be able to meet our criteria even better.
Deliver–
• This final step of design thinking process was our final map of maker which is the photo at the very top.
Core Values Reflection–
During this process in making of the maker map, I was able to use two core values which were Empathy & Curiosity. What do they mean? How did I use them? You may ask, well allow me to explain….
Empathy– Helping or disagreeing /agreeing to ideas to help one another out or feel for each other to understands one’s opinion or statement the other has claimed.
A time where I used Empathy was that I was able to assist Hayden in adding stuff and understanding her explanation on why it was needed to be added and whether I were to agree or disagree.
Another example can be used outside of class such as, when I was able to assist my sister in her project and we both shared off many opinions and why they should be added in her powerpoint. She nailed that project.
Curiosity– Exploring different ideas, options, or even opinions/statements. Its to also be open minded about any ideas that come to also explore those too.
A time where I used Curiosity was when I was able to look through my planner, and look at the staffs answer, and also the knows and needs to know and explore those ideas to see if there were anything that I could add that would be useful in the map.
This core value can be used outside as well and an example of these is when I learned about the LGBTQ community and was learning about the many things among it and I was pretty amazed about it.
Collaboration & Communication Reflection–
During the completion of this map, I was able to collaborate with others in my group to help complete the map of maker. An example of this moment was when we were helping/adding onto the “Pro Tips” Section of the map because we wanted to be able to add more information that’ll help any future maker.
How Do We Spot Fake News?
Everyday in our lives the news will always exist. Although ever stop to wonder if any of the news that they put out is even true? If anything they could have been lying to everyone and not one person could have known about it but that right there is called fake news. What is fake news anyways? Fake news is when information that gets out about the real world on live t.v, or a news channel, or even the news article that is a lie. During the year on 2016 it was the year of fake news and since then in 2017 it became really hard to notice the difference between real news and fake news. The two can even have a bias perspective as an example! In case you don’t know what bias is, Its an act of only one’s perspective or just choosing one side of a case instead if allowing both sides of the case. Although for today, allow me to show you why is it important to spot fake news by using Design Thinking.
Why Is It Important To Spot Fake News?–
We all watch the news and I bet we even question if the news we watch is even true. That’s why it’s important to spot fake news. Spotting fake news can actually help us in our everyday lives so that we don’t get informed with the wrong information about politics, our environment, or even real life situation. There are many ways in order to spot them which is what I’m going to be able to teach you today! Spotting fake news may be hard but it’s a lot easier than what you honestly think.
Strategies –
- A way to spot fake news is by using the “E.S.C.A.P.E” Method. Each letter represents a different way to spot fake news.
– “E” This – letter represents “Evidence” If the facts hold up? When doing evidence you must check out the numbers, name, places, and the documents.
–“S” This second letter represents “Source” To know who made the article and if you are able to trust them or not. For this you must check the author, publisher, founders, aggregation, as well as social media users.
-“C” This third letter represents “Context” Which is to find the big picture. For this you’ll need to check for the current events, current trends, as well as political goals and even financial pressures.
-“A” This is the fourth letter which represents “Audience” Which to see who is the audience intended for? For this you must look at the image choices. presentation techniques, language, and finally the context.
-“P” This is the fifth letter which represents “purpose” For this you’ll need to find out the publisher mission (goal), presentation, persuasive language or an images, money making tactics, stated or unstated agendas, as well as calls to action.
-“E” The final last letter represents “Execution” Which is how the information presented. When doing so you’ll need to look at the style, the grammar, and the tone, as well as the image choices and even the placements and layouts.
Using the “E.S.C.A.P.E” Method is a very good way in identifying fake news but it’s just one way, allow me to introduce you into another method.
- This way may be short although another way to identify fake news is by looking at the search bar of the website at the very far right you should be able to see a tiny green lock and that represents that the website is very protected and will save your information if you put any. If the website doesn’t show a green lock then that website could be a scam which can steal your information.
- Another method that can come in use is by checking all the way down on the website to see if its by anyway to just see if anything is wrong with the website and to be sure to do your research on anything you think that looks wrong in the website.
Design Thinking–
Through this whole unit I was able to use the design thinking method which are the 5 D’s. In case you don’t know what they are..
- Discover
- Define
- design
- Develop
- Deliver
The way that they work is by Discovering the issue to address then Define the specific problem, after you must Design and test the product, then Develop and refine our solution, and finally Deliver our final product.
During this unit I was able to use the 5 D’s in order to able to create my deliverable which is this blog post. First one is discover. The way that I was able to use discover was by figuring out that there is fake news and we must know about it or else we will get fake information in our heads. After I was able to define the situation which was any websites such as a news website, a website used for helping children and family, ECT. Sure they may seem real but are they really? Next, I was able to design my strategies which are used to help me and others to figure out if the websites we are looking at are fake or not. Then, I must develop the solution which is to state if the website is fake or not. Last but not least, I was able to create my deliverable which was this explaining everything I learned about fake news and how to spot them and as well as how they are used and are able to be used by the design thinking process.
